
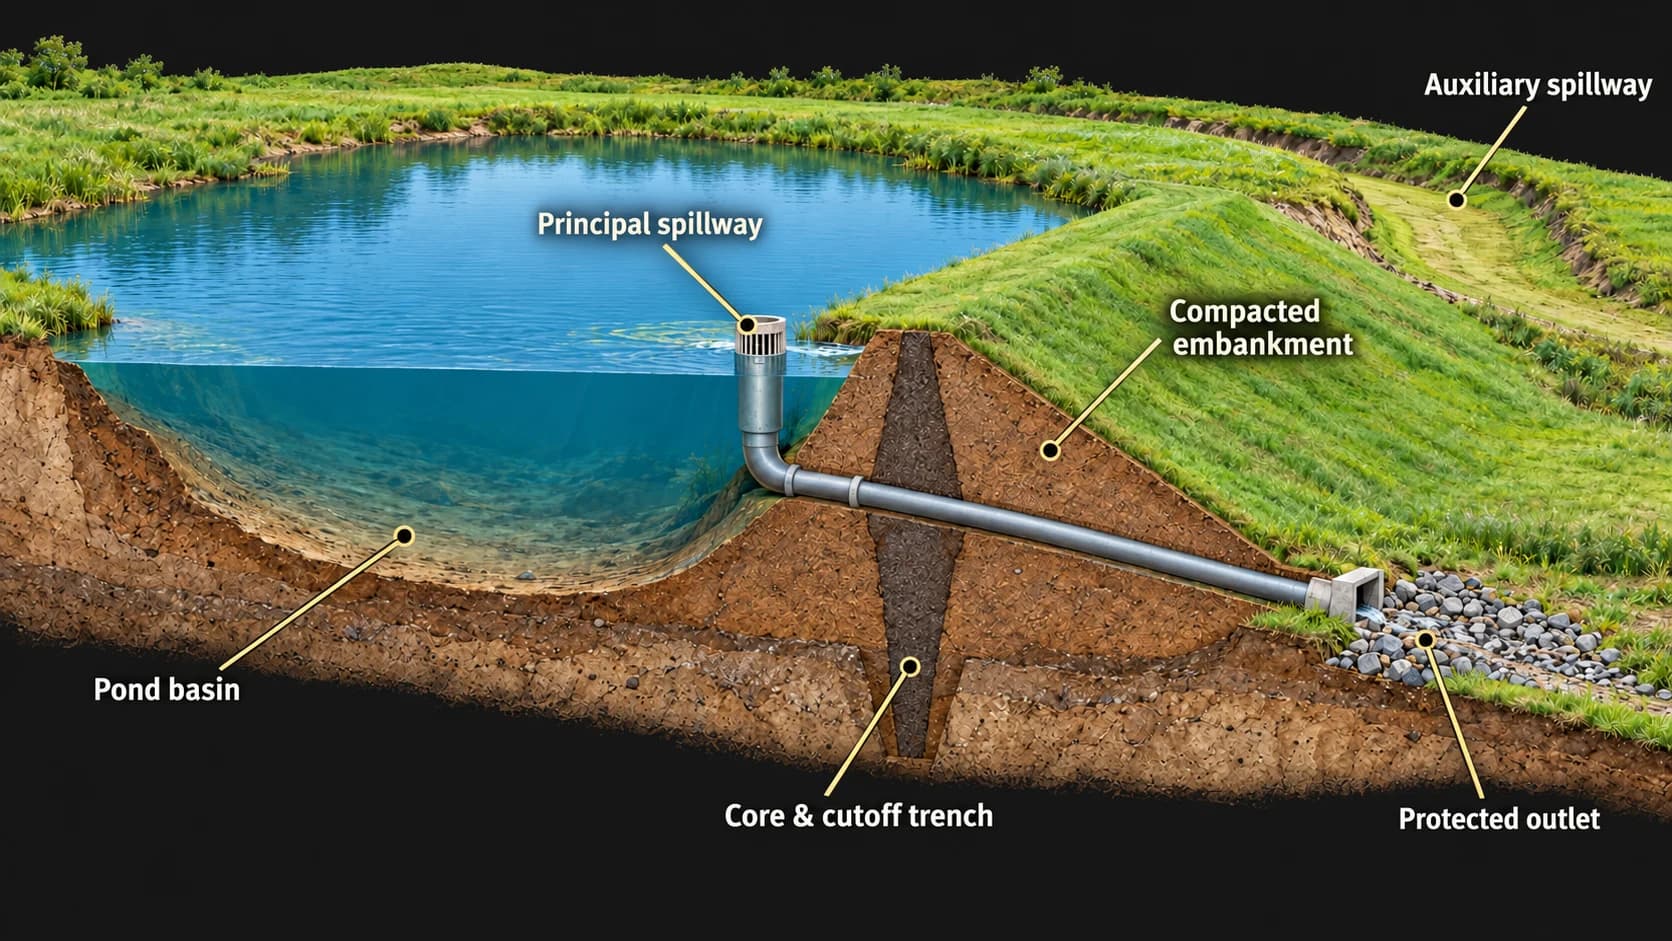
A finished pond hides much of the work that makes it function. The shape you see from the bank is only part of the picture. The ground beneath the dam, the way the fill was compacted, and the routes provided for excess water all matter.
First, know which kind of pond you are building
An embankment pond uses an earth dam to hold water across a low area. An excavated pond is dug into the ground and may not need a raised dam. Some projects combine both. The illustration shows an embankment pond; it is an explanation of the parts, not a construction plan.
The New York State DEC overview explains these different pond types and why foundation preparation, construction specifications, and spillway design matter for an impounded pond.
The six parts in the illustration
1. Pond basin
The shaped area that stores water. Its soils, depth, and banks need to suit the site and intended use; excavating a bowl does not by itself make it hold water.
2. Compacted embankment
The earth dam that holds back the pond. Suitable fill is placed and compacted in controlled layers. Its crest sits above the planned water levels, with freeboard specified in the design.
3. Core & cutoff trench
A zone of low-permeability material connects the dam to its foundation to limit seepage. The required depth, extent, and material depend on what the site investigation finds.
4. Principal spillway
The main outlet for ordinary overflow. In this example, an inlet connects to a pipe through the dam. Pipe joints, seepage control, and the surrounding fill need designed construction details.
5. Auxiliary spillway
A separate route for larger flows, usually around an end of the dam. Its elevation, capacity, and erosion protection are designed so overflow follows that route instead of crossing the dam crest.
6. Protected outlet
The place where discharged water returns to the downstream ground. Rock or other specified protection helps manage erosion; the outlet must be considered together with the receiving drainage path.
NRCS Agriculture Handbook 590 explains the relationship between these features. Actual slopes, elevations, pipe details, filters or drains, and spillway capacity belong in the site-specific design; the illustration omits those dimensions and details.
What happens during construction?
1. Investigate the site and set the plan
Start with the intended use, a survey of the ground, soil investigation, and the source of water. The drainage area feeding the pond affects both the water supply and the runoff the outlets must accommodate. Confirm the design and required approvals before scheduling excavation.
2. Prepare the foundation and work area
Establish access and clearing limits, set aside usable topsoil, and prepare the dam foundation. Roots, stumps, organic matter, and unsuitable soil must not simply be buried beneath structural fill. Inspect the foundation and cutoff excavation before those areas disappear under the next stage of work.
3. Build the earthwork and install the outlets
Excavation, material placement, and outlet installation are coordinated. Suitable soil is placed in controlled layers and compacted at the specified moisture and density. Soil around pipes needs particular attention. A dam is not finished by pushing a pile of dirt into place and driving across the top.
Alabama Extension’s construction guide covers foundation preparation, cutoff trenches, fill placement, and compaction. The equipment, layer thickness, and inspection requirements should follow the project specifications.
4. Finish, stabilize, and document
Complete the specified grading, outlet protection, and erosion-control work. Establish appropriate vegetation and maintain access for inspection. Record the installed outlets and important construction stages while they are still visible, then review the finished work against the agreed plans.
University of Missouri Extension discusses why compaction around water-control structures and prompt vegetation establishment are important parts of pond construction.
The pond includes the land around it
Bare, eroding ground upstream can send sediment into the basin. Vegetation on the dam and spillway protects exposed soil, while woody growth and livestock damage can create maintenance problems. Plan how you will inspect the inlet, outlet, embankment, and overflow route after the job is complete.
Oklahoma State University’s pond guide connects watershed care, spillway protection, vegetation, and livestock access with the life of the pond.
Bring these questions to your contractor
- What did the soil investigation establish, and is sealing work needed?
- Who provides the design, permits, surveys, and construction verification?
- What fill, compaction, pipe, and erosion-control details are included?
- Where will excavated material go, and how will equipment reach the site?
- What is documented at handoff, and what maintenance remains for the owner?
Use those answers alongside our pond cost guide to compare proposals. For a project in Texas, Oklahoma, Colorado, or New Mexico, start a pond construction discussion with your location, goals, and current site photographs.